
Obligatory disclaimer: We at TRC take safety seriously. We are not medical professionals. We do not encourage the act of cutting and/or blood drinking. In no way is this article an attempt at downplaying the serious nature of such an undertaking. Please be aware that blood-letting is intrinsically dangerous and carries with it some severe risks that can negatively affect all parties involved. Hazards and related complications include, but are not limited to, the transmission of blood-borne pathogens, permanent bodily / mental harm, social discomfort / stigma, legal damages / repercussions, and in extreme cases, potential mortality. By utilizing any of this information, you agree to and assume 100% of the risks and liabilities involved.
You know what you need, but where do you start?
Sliding a blade through someone’s skin is a daunting concept to entertain, especially when it may harbor some potentially discomforting visceral imagery and inclination. Many of us, in fact, have gone through persistent, formidable bouts of self scrutiny / objection, cognitive dissonance, despair and guilt over it, yet none can deny the fact that there are few other ways to actually get what we need. Coming to terms with this part of ourselves and what it entails is extremely important, both for peace of mind and general health. It doesn’t have to be a dangerously unmanageable process and – this can’t be emphasized enough here – being cautious, alert, and well informed are crucial to that purpose. Being well informed about anatomy, physiology, and safety will help you get a decent bleed without accidentally maiming your donor in the process. Let’s be completely honest here: charging blindly into cutting for blood-letting purposes, like some proverbial bull in a china shop, is recipe for a probable disaster.
First and foremost, talk to your donor. Be respectful. Don’t surprise them or leave the details and circumstances up to pure, wavering chance. Both parties should be completely upfront and transparent with one another about their personal boundaries and expectations of the situation. Discuss any health or lifestyle concerns that might affect the forthcoming process or potential safety of the act. Make sure that they are physically able to donate in the first place. Have they any medical issues, such as anemia, diabetes, immune disorders, or heart problems that might make donating difficult, even dangerous? As a prophylactic measure, make sure that they are tested (full panel) at least bi-annually for blood-borne pathogens. If they are to come in contact with your bodily fluids (e.g. saliva), you need to be tested for these things, as well. Carefully go over the details of the donation, including the risks involved, and make sure that they are entirely on board with these things before you start cutting.
Please also remember that cutting people, no matter the reason and with or without consent, can result in legal indictment and prosecution. Consent to bodily harm in the U.S. alone is a perilous thing to maneuver around. What we do does indeed fall into the realm of this safeguard. The law of consent implies protections such as “an individual cannot consent to circumstances that involve the possibility of serious bodily injury” and “a criminal defendant cannot assert a defense of consent when they are charged with assault.” Take great care in how you approach the entire situation and show respect to the boundaries and well-being of your donor at all times. If you have difficulties with control, make sure that they are aware of this, and take necessary steps to avoid possible serious injuries. Another note worthy of mentioning here is that one should not partake in the consumption of drugs and alcohol while performing blood-letting activities. Impaired judgement and a knife can lead to some horrifying situations.
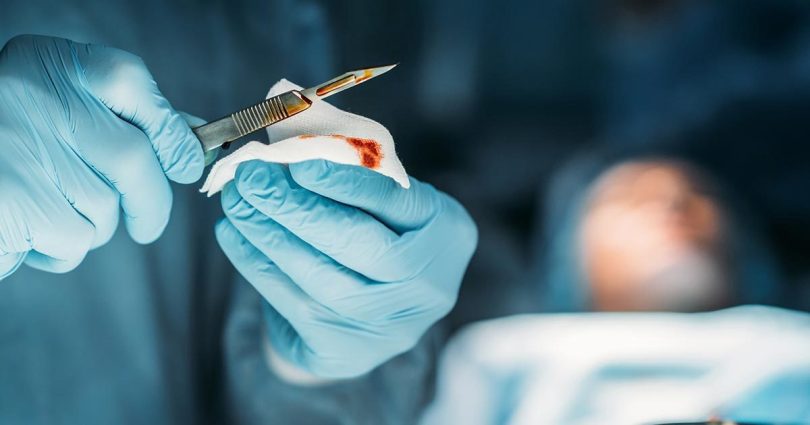
On the Adequacy of Blades; Put Your Pocket Knife Away
Many knives aren’t recommended for cutting with this purpose in mind. Why? One important reason is that no matter how sincerely you believe you can clean or sharpen them, these blades (and their components) will still be questionable in either regard. Sharp knives need less brute force to cut than dull knives. This means less damage to your donor by way of reducing cellular damage to the area surrounding the cut. Sterilized, disposable, surgical grade scalpels are ideal tools for the job. Not only can they be discarded after each use, they are incredibly sharp, thin, and lightweight, yet still possess the strength and stability for success in the intended endeavor. These features help with both control and making a clean cut that closes / heals better and scars less. Medical scalpels come in entirely disposable varieties, or as disposable / replaceable blades with handles, preferably made of stainless steel, that can be kept and more easily sterilized.
When it comes to the actual shape of the blade, many tend to prefer those that are small and come with a slight curve to the one-sided cutting edge. Keep in mind that these blades can cut extremely deep with minimal effort, so applying a light, steady hand is strongly advised. For those who are new to this sort of thing, a small, straight-edged blade can offer a more shallow cut with less potential for accidentally causing severe damage by straying into deep tissue. These sterile blades can be found individually wrapped in boxes of up to 100. Having several handles close at hand is also recommended, as you never know when they might inadvertently become contaminated. You can find both on medical supply websites or even the ubiquitous Amazon.
Never re-use these blades. They will not be as sharp as they were before use, nor can they be disinfected at home without further damage likely occurring to the delicate business end. Additionally, it’s worth noting that once you lay a blade down, it’s no longer sterile. Remove it, put it in a sharps bin, wash your hands, and start again with a clean area and sterile equipment. The moral of the story is: if you can’t sterilize your tools, don’t use them. Boiling, btw, while decent at disinfecting, does not equate to sterilization. There’s debate whether using a pressure cooker [2] as a make shift autoclave is effective enough to sterilize equipment, such as scalpel handles, at home. For our own personal use, sadly, this may be the best and only option for a higher level of decontamination, but it’s expensive, more complicated, etc. Disposable scalpels / blades are just an all around safer, practical, and more economic choice for most sangs.
Anatomy – It’s Not An Afterthought
Don’t be lazy and irresponsible when it comes to the health and well-being of yourself and those trying to help you. Develop and cultivate an education constructed around the safer spots to cut, so you (hopefully) won’t find yourself in the rather unfortunate situation of being in the emergency room with an awful lot to explain, or worse.. Knowing the anatomy of the area you intend to cut is extremely important for various reasons, both obvious and not.
Classes on anatomy and physiology are an ideal medium to initiate a proper understanding of the body. At the very least, however, find several reputable resources, and do a considerable amount of research before dipping your toes into such an activity. Please take the time to also carefully evaluate potential, acceptable (and allowable) areas on your donor’s body, as everyone has different amounts of tissues that may render a particular spot nonviable.
When choosing a location, be aware that wounds in certain areas are increasingly more difficult to heal – their position and composition makes them inherently prone to re-opening and infection. Some areas are dangerous by their direct relation to certain intricate or critical structures. Not only can you accidentally open larger, more dangerous blood vessels, you can also irreversibly damage nerves, tendons, and delicate tissues. Avoid creases, jointed areas, regions that are close to bones, and skin that is extremely thin or stretches excessively with movement. Due to the high risks involved, cutting areas such as the hands, wrists/forearms, feet/ankles, inner thigh, inguinal (groin) areas, and neck are highly discouraged.
Keep in mind that vascular & nervous anatomy in some locations can be surprisingly deceptive from the surface. The general rule of thumb is this: if you don’t know the area well, don’t go there, even if you can’t see any visible, problematic signs. The muscular, well protected areas on the body tend to provide safer areas to cut. They’re more solid, less structurally complicated, and also likely heal easier. The go-to spot for most sangs tends to be horizontally on the muscular part of the back shoulder, as the potentially dangerous vessels and structures are more inclined to run deeper there.
Bleeding and Clotting, or Sang’s Boon and Bane
Sadly, though unsurprisingly, areas not particularly rich in blood vessels also tend to bleed less and, therefore, clot more easily. Irony is painful, yes? That being said, resist the urge to cut deeply and/or cause more tissue trauma to your donor. Not only can you cause heavy, uncontrollable bleeding by doing so, you may also introduce harmful bacteria, create a wound that’s extremely difficult to heal, needs stitching, is severely scarring, causes permanent nerve damage, and other unpleasantries. To help with blood flow, there are safer methods that can be attempted. Fibrin, you’re amazing, my friend, but we hate you (sometimes).
If your donor is dehydrated, they’re not going to taste well, let alone bleed well. Hydration should be one of the first things you both address, especially in the immediate days and hours beforehand. Plain water is suggested for this purpose, as quite a few other popular beverages are diuretics that can actually contribute to fluid loss. The Red Cross recommends drinking at least 16 oz. of water before donating. Though perhaps a bit excessive for the amount of blood drawn by cutting, it can’t hurt here either. Not only does dehydration make bleeding difficult, it can also lead to your donor feeling ill and possibly fainting during the process. In extreme cases, especially when blood loss is also involved, it can send someone into hypovolemic shock.
Heat and movement cause blood vessels to dilate. A donor should consider wearing something warm before donating. Even a blanket can be helpful, as being cold naturally causes vasoconstriction of blood vessels close to the skin. Massaging the area of choice for a few minutes, and/or using a warm compress, heating pad, heel warmer, etc. beforehand, can help increase circulation initially. It should be warm and comfortable, not hot. Be aware, however, that this can potentially cause inflammation later. It may also lead to the fruition of a potentially awkward scenario. (ドキドキ … )
Aspirin has anti-platelet properties that, if taken a few hours beforehand, can help slow the process of clotting. Keep in mind that, despite its commonality and seemingly innocuous nature, aspirin usage can result in serious, possibly life threatening side-effects. Severe and/or excessive bleeding (both internally & externally), ASA poisoning, gastrointestinal injury, hepatotoxic liver damage, and kidney failure are but a few of the problems that can occur, especially with abuse and the neglect of safety / dosage guidelines.
It should go without saying but here it is: never stab your donor. There are a variety of reasons why this is not only an extremely dangerous / unacceptable action, but also ineffective for our purposes. Drawing a blade carefully across the skin, cutting only the surface capillaries, is the safest option for this type of bleeding. Doing this in an X-like manner can offer more flow at the origin and yield a better bleed. Similarly, making multiple cuts that are parallel and closer together can also help bring more to the surface. The onset of clotting can be somewhat discouraged by wiping gently with sterile saline pads. A lot of caution is recommended here – doing this can potentially cause irritation, introduce contamination (bacteria, etc.), and cause more damage to the wound area / channel.
Most sangs suffer from a deep inclination to bite (hard), so it’s important to remember that serious tissue damage, devitalization, and loss can occur. This is particularly true when biting with the actual intent of drawing blood is involved. Biting can induce crushing trauma, contusions, puncturing, tearing, and laceration. It can result in all of the previous damages mentioned for cutting, along with potential avulsion / degloving of the flesh and other embedded structures. A bite wound isn’t uniform; it involves crevices, tears, etc. that can lead to major healing difficulties. It’s also the perfect way to introduce bacterial and viral pathogens directly into the flesh by force. Scientist estimate that the oral microbiome can contain up to 6 billion + bacteria – 100 million bacteria per milliliter of saliva alone. Make sure that you’re upfront and clear about potential biting problems with your donor. Being sangry doesn’t give you the right to be unsafe and abusive.
I’ll say it again: despite the innate urge, it is generally not advised to place your mouth on the wound itself or to bite. Whilst always recommended, brushing your teeth/tongue and using mouthwash beforehand are not sufficient means to ensuring sterility nor safety. The potential for causing bacterial infections, even transmitting pathogens, still remain if you choose this path. If you believe your mouth to be completely safe and worry free, I invite you to rinse it with a salt water solution to see just how fragile it really is.. Many compromise the situation by letting the blood run away from the wound, where they (somewhat precariously) maneuver it into their mouths – carefully though, as to not to contaminate the source.
Pre / Post Cleanup and Care
Your donor should shower beforehand, if possible, as it can help partially decrease the bacterial count on their skin, at least for a short time. Always wash your hands before you cut, if you intend to touch the area near the wound for any reason, and prior to beginning aftercare. Use of disposable gloves (on clean, dry hands) is another way to prevent possible contamination. Never wash disposable gloves, folks – change them. Make sure your donor is comfortable and either sitting or lying to prevent a possible falling accident. Confirm that all necessary items are close at hand before you commence prepping the site.
Always clean the intended area thoroughly with an antiseptic before making any sort of incision. This is a necessary, precautionary measure and should done without exception. 70% isopropyl alcohol will work for this purpose. Leaving it on the skin for at least a minute before proceeding is recommended. It tastes terrible, by the way, like most antiseptics do, and, regrettably, it’s not the kind of oral disturbance that goes away quickly.
How does one get around such an unappetizing conundrum without cross contaminating the site? Good question. Using a sterile saline pad a few centimeters below the wound area is helpful. Whether this is done before or after cutting, please make sure to avoid the actual wound, or the intended, prepped area in its entirety. Wipe away from it, in one direction, and only once per pad. You may still have some residual chemical taste but it will be better than the alternative.
Be forewarned, comrades: if you put your mouth on the wound itself, much more aggressive measures will be required in order to attempt the proper cleaning of it. Unfortunately, these actions may also cause problems with its healing..
When the act itself is over, rinse the wound with cool water to help initially remove any possible debris. The area around the open wound should be cleansed gently, but well, with cool, running water and a mild soap. Avoid getting soap in the actual wound channel, as this can cause irritation. After cleanup, carefully pat the area dry with a clean, lint free cloth. This should be continued at least twice a day to prevent infection as new tissue forms.
Before applying an ointment, moist barrier, and/or a new bandage, give the wound time to clot for half an hour. This will allow a natural fibrin film to form that can be beneficial to the healing process. Using a moist wound environment can be helpful by reducing healing times, impeding the introduction of bacteria, decreasing desiccation and potential rupture, adjusting the PH of the wound, reducing pain, and minimizing scarification. Some caution is recommended with this method, however. If the wound is contaminated, the barrier can become a possible germ trap for malicious anaerobic or facultative microbes that can survive in low / no oxygen environments.
Covering the wound with a bandage for 2-5 days until sufficiently closed will help to minimize bacterial invasion and protect against possible re-opening occurring from outside friction / interference. It’s worth noting, however, that oxygen is important for the body’s regenerative process. Keep it somewhat loose to help with aeration, as complete deprivation can be detrimental to healing and actually promote bacterial growth. Furthermore, when removed, a bandage that sits tightly against a wound can rip off the closing tissue that has formed, causing longer healing times and more potential scarring. If proving difficult, try taking it off in the shower, or moisten the bandage with saline before disturbing.
Caution is recommend with the overuse of antiseptics in open wounds, especially if they’re not infected or contaminated. There are emerging studies showing that, contrary to popular belief, substances such as isopropyl alcohol, hydrogen peroxide, chlorhexidine, povidone-iodine, benzalkonium chloride, ingredients in antibacterial soaps, etc. can be damaging to tissue, potentially causing irritation, and actually impeding the healing process. Similarly, if the use of an ointment is decided upon, whether antiseptic or not, make sure there are no adverse reactions. Skin allergies or intolerances may cause discomfort, weeping, and rashes, which can lead to dermatitis and indirect infection due to touching / scratching.
Unfavorable scarring is an unfortunate reality of blood-letting, especially when it comes to cutting, and it’s definitely a topic worth discussing with your donor. Please make sure to only choose areas that they can readily accept possible scar formation on. Regions visible under normal / casual circumstances are not recommended, as it may cause social problems for your donor. Generally speaking, the the potential for scarring increases with the depth, length, and how flush, or smoothly aligned the edges of the cut are, so keep these things in mind before you make an incision.
The more work your body has to do to close the wound (i.e. with the tissue formation, re-wounding, abrasion, etc..) the more likely a scar will develop. Taking care of the wound site, not introducing contaminates, irritants, foreign bodies, causing breakage of the newly formed tissue, and avoiding direct sunlight to the area can help reduce scarification. Please be aware that cutting in areas directly affected by the rubbing parts of clothing may also result in difficulty of healing and increase the exacerbation of marking your donor. Additionally, your donor may develop keloids for the above reasons, or simply because they are predisposed to such. Following correct wound care, monitoring the area, and seeking treatment for problems before they get out of hand can help greatly minimize scarring.
What If Things Go Wrong?
Being caught up in the moment might be difficult to avoid, but if for any reason, you or your donor are reacting badly to the situation: Stop the donation. Keep communication open and be prepared for any problems that might arise. When breaching the flesh and dealing with pain, it’s not uncommon to experience a flood of endorphins. These chemicals can initially be overwhelming and drop off quite suddenly. Either has the potential to leave your donor feeling abruptly ill. Keep some quick carbohydrates and liquids close at hand – water, juice, bland crackers, and sweets – to help with a possible vaso-vagal / syncopic (fainting) episode. Have a comfortable space for them to lie down for 10-15 minutes while they recover.
Always have a first aid kit within easy reach when cutting. Items recommended are disposable gloves, alcohol/antiseptic wipes, saline, gauze pads, compress dressings, medical tape, bandages, steri-strips, and cold/hot packs. Have important health and medical information, such as contact numbers, medications, blood type, known illnesses, etc., ready in case of an emergency. Invest in blade removing forceps and a sharps container for your used blades. Becoming officially certified for first aid is a wonderful thing to consider if you practice blood-letting.
If the wound is deeper than 0.25-inches or longer than 0.75 inches, doesn’t close easily, or stop bleeding within a few minutes, your donor likely needs stitches. If they are turning pale, sweating, behaving strangely, or their wound is bleeding excessively, lay them down and begin preparing for a possible emergency situation, such as the onset of hypovolemic shock. Try to keep the area of the wound situated higher than that of the heart. Use caution, however, as this can, depending on the location of the wound, also slow blood flow to the brain. Cover the wound with a compress – do not remove if soaked – and continue adding more layers, if necessary, whilst applying and maintain pressure. Call your local emergency services or personally get your donor to the emergency room immediately!
Now breathe. Sounds extreme doesn’t it? This is an exaggerated situation, hopefully, but don’t deceive yourself – blood-letting like this is dangerous, no matter your methods. When you go beyond scratching people, the situation develops into something much more than nonchalant playtime, especially if you don’t know what the hell you’re doing. May you never face such a frightening, possibly tragic situation. This article was compiled because we believe that being informed and prepared is fundamental to preventing these types of accidents from occurring to begin with. Having a body of knowledge to lean on not only helps with providing a measure of safety for yourself and others, it can also make the process easier and give you the best possible bleed for the circumstance. Anyhow, we hope this has offered some insight into the process, safety, and other issues that could arise during sanguivory practices. In closing, stay safe, sane, and consensual, folks. It applies to what we do, as well.
I’ve compiled a list of links to sources and further reading material on several subjects that should be of interest to those who deal with this sort of thing on a regular basis. Some of it is more advanced than what may be required for our purposes, but much of the information is relevant and touches on a number of things that are important to understand.
Information on Blood-borne Pathogens & STD Testing:
Essential Blood and Urine Test Panel, 9 Tests
STDcheck.com
Exposure to Blood
Oral, Skin, & Wound Microbes:
Microbes of the Mouth
Defining the Normal Bacterial Flora of the Oral Cavity
The Human Oral Microbiome
Streptococcal Infections
Staphylococcal Infections
Wound and Skin Infections
Common Bacteria that Cause Infections in Wound Management
Skin and Soft Tissue Infection (Cellulitis)
Epidemiologic Background of Hand Hygiene and Evaluation of the Most Important Agents for Scrubs and Rubs
Complications of Biting:
Medscape : Human Bites
Human Bites: Evaluation and Management
Human Bites from the American Academy of Orthopaedic Surgeons
Managing Human Bites
Wound Care:
Proper Wound Care: How to Minimize a Scar
Wound cleaning 101
Wound Healing Essentials: Let There Be Oxygen
Why Petroleum Jelly May Be Unfavorable to Initial Wound Healing
Wound Moisture Balance
Skin Cuts and Abrasions
Surgical Wound Care
American College of Surgeons : Surgical Wounds
Acidic Environment and Wound Healing: A Review
Critical Thinking and Treatment Strategies for Wounds
Does Your Cut Need Stitches?
Serious Vs. Minor Wounds : Common Signs Your Cut Needs Stitches
Dermatologists Share Tips for Reducing Scars
Diagnosing Scars and Keloids
Antiseptics
Possible Complications During Blood Loss:
Vasovagal Syncope
Treating Low Blood Sugar
Low Blood Glucose (Hypoglycemia)
What to Know About Hypovolemic Shock
Response to Haemorrhage: The Loss of 1L of Blood
Adverse Reactions During Voluntary Donation of Blood and/or Blood Components
Frequently Asked Questions About Iron and Blood Donation
Anatomy & Physiology:
Circulatory System : Vessels of the Arms
Miscellany:
Aspirin Use for Primary Prevention With Cardiovascular Events and Bleeding Events
Aspirin and Other Salicylate Poisoning (Salicylism)
Law of Consent
Which Surgical Blades are Right for Your Operating Room?
